如何:安装与配置nginx下的php (PHP-FPM模式)
准备工作
使用FreeBSD的Ports安装软件时,请一定先把Ports更新到最新版本
#portsnap fetch update
如果你是第一次使用portsnap,可能需要先执行
#portsnap extract
安装并启用nginx服务
首先,安装nginx:
#cd /usr/ports/www/nginx
#make install clean
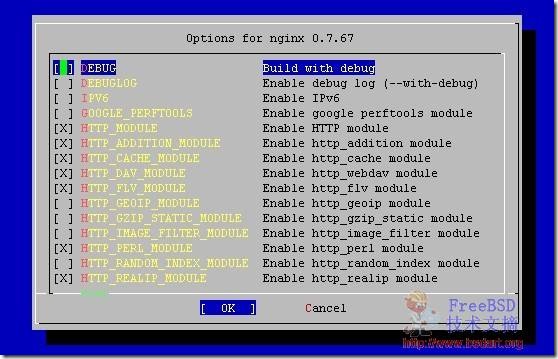
在出现的选项中,可能有一些你不熟悉的选项存在,如果你不明白各个选项的含义,可以用下面的默认值:
[X] HTTP_MODULE Enable HTTP module
[X] HTTP_ADDITION_MODULE Enable http_addition module
[X] HTTP_CACHE_MODULE Enable http_cache module
[X] HTTP_DAV_MODULE Enable http_webdav module
[X] HTTP_FLV_MODULE Enable http_flv module
[X] HTTP_GEOIP_MODULE Enable http_geoip module
[X] HTTP_GZIP_STATIC_MODULE Enable http_gzip_static module
[X] HTTP_IMAGE_FILTER_MODULE Enable http_image_filter module
[X] HTTP_PERL_MODULE Enable http_perl module
[X] HTTP_RANDOM_INDEX_MODULE Enable http_random_index module
[X] HTTP_REALIP_MODULE Enable http_realip module
[X] HTTP_REWRITE_MODULE Enable http_rewrite module
[X] HTTP_SECURE_LINK_MODULE Enable http_secure_link module
[X] HTTP_SSL_MODULE Enable http_ssl module
[X] HTTP_STATUS_MODULE Enable http_stub_status module
[X] HTTP_SUB_MODULE Enable http_sub module
[X] HTTP_XSLT_MODULE Enable http_xslt module
在命令执行完成后,使用编辑器把下面的内容添加到/etc/rc.conf中
nginx_enable="YES"
安装PHP-FPM及相关连的包
以root身份继续执行下面的操作
#cd /usr/ports/devel/pcre
#make install clean
#cd /usr/ports/devel/libtool
#make install clean
#cd /usr/ports/lang/php5
#make install clean
#cd /usr/ports/lang/php5-extensions
#make install clean
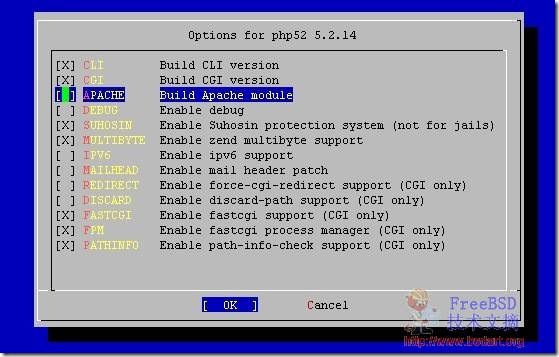
在php5-extensions的config页面中,需要勾选PHP-FPM项。
执行完成后,把下面的代码加入/etc/rc.conf以启用PHP-FPM
php_fpm_enable="YES"
同时还要创建一个php.ini文件:
#cp /usr/local/etc/php.ini-production /usr/local/etc/php.ini
同时可以编辑php.ini,把里面的timezone设置为Asia/Shanghai或者需要使用的时区。
启动服务
#/usr/local/etc/rc.d/php-fpm start
#/usr/local/etc/rc.d/nginx start
这样就成功启动了服务
配置虚拟主机运行PHP程序
准备网站目录
首先建立网站的目录和日志存放目录,日志即可以配置到/var/logs/nginx下面,也可以配置到任何你希望存放的位置。
mkdir /home/saharabear.com/public_html
mkdir /home/saharabear.com/logs
配置nginx.conf
可以直接参考下面的配置文件来修改/usr/local/etc/nginx/nginx.conf
user nobody;
worker_processes 1;
error_log logs/error.log;
pid logs/nginx.pid;
events {
worker_connections 1024;
}
http {
include mime.types;
default_type application/octet-stream;
log_format main ‘$remote_addr – $remote_user [$time_local] "$request" ‘
‘$status $body_bytes_sent "$http_referer" ‘
‘"$http_user_agent" "$http_x_forwarded_for"’;
sendfile on;
keepalive_timeout 65;
gzip on;
# We define the virtual host here
server {
listen 208.62.123.122:80;
server_name saharabear.com www.saharabear.com;
access_log /home/saharabear.com/logs/access.log main;
location / {
root /home/saharabear.com/public_html;
index index.html index.htm index.php;
}
# Let nginx know how to handle PHP using fastcgi
location ~ \.php$ {
root html;
fastcgi_pass 127.0.0.1:9000;
fastcgi_index index.php;
fastcgi_param SCRIPT_FILENAME /home/saharabear.com/public_html$fastcgi_script_name;
# 上面这一行很重要,别忘了修改这里
include fastcgi_params;
}
location ~ /\.ht {
deny all;
}
}
}
重新启动nginx服务器就可以了
#/usr/local/etc/rc.d/nginx restart
配置虚拟主机运行使用Symfony2框架的PHP程序
对于PHP的Symfony2框架,配置nginx可能会有一些不同,比如Symfony2使用app.php和app_dev.php作为前端入口等等,可以参考下面的代码配置Symfony2的PHP程序
server {
listen 80;
server_name test.saharabear.com ;
root /home/test.saharabear.com/symfony/web;
charset utf-8;
access_log /home/test.saharabear.com/logs/access.log main;
error_log /home/test.saharabear.com/logs/errors.log;
# strip app.php/ prefix if it is present
rewrite ^/app\.php/?(.*)$ /$1 permanent;
location / {
index app.php;
try_files $uri @rewriteapp;
}
location @rewriteapp {
rewrite ^(.*)$ /app.php/$1 last;
}
# pass the PHP scripts to FastCGI server listening on 127.0.0.1:9000
location ~ ^/(app|app_dev)\.php(/|$) {
fastcgi_pass 127.0.0.1:9000;
fastcgi_split_path_info ^(.+\.php)(/.*)$;
include fastcgi_params;
fastcgi_param SCRIPT_FILENAME $document_root$fastcgi_script_name;
fastcgi_param HTTPS off;
}
# deny access to .htaccess files, if Apache’s document root
# concurs with nginx’s one
#
location ~ /\.ht {
deny all;
}
}
原文链接:https://wiki.freebsdchina.org/howto/n/php_php-fpm_nginx

